Color Management
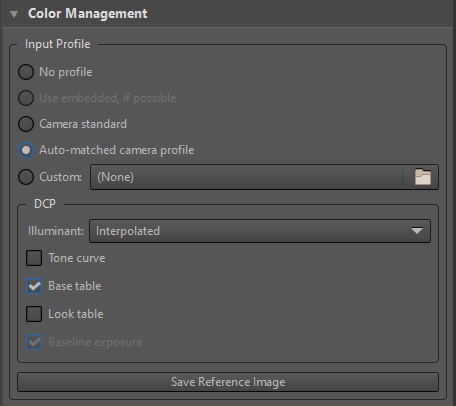
Color management comprises all tasks to ensure a faithful representation of colors from scene to intermediate formats, editors and various output media. This is an often complicated and technical matter that RawTherapee tries to handle as correctly as possible behind the scenes. More can be read about it here. The various options of the Color Management tool are explained below.
Input Profile
An essential first step in raw processing is the faithful conversion of the camera sensor data to an internal RGB color space. This conversion requires an input profile made specifically for the camera. Such a profile is the result of the analysis of how specific colors and tones are captured, processed and represented as raw data by the camera (for more details, see e.g. Elle Stone's article, DCamProf's documentation or How to create DCP color profiles. Without a camera-specific input profile, accurate color representation is impossible.
The input profile is applied to the image data at the beginning of RawTherapee's processing pipeline because most tools depend on it. There are several ways to apply an input profile.
No Profile
No color conversion will take place and a unit transform of the image data is applied. Do not use this for regular editing. Applying no input profile is generally only useful for analytical purposes to show images in the camera's native RGB color space, or in extreme cases to prevent clipping of channels when the camera has recorded colors outside of conventional gamuts.
Note that selecting 'No Profile' for non-raw files bypasses the embedded color profile and the working profile will be assigned. This means that gamma-encoded files (e.g. sRGB) will be assumed linear, making them look brighter.
Use embedded, if possible
Only available for non-raw files. The embedded color profile is used. Which profile is embedded can be checked with GIMP for example.
Camera Standard
A conversion takes place based on profiled information from either of three sources, in decreasing priority:
- The
dcraw_matrixfield in thecamconst.jsondata file available in RawTherapee's installation directory; - Hard-coded values provided by the
dcrawlibrary embedded within RawTherapee; - The raw file itself.
There is one exception: when a DNG raw file has a ColorMatrix2 Exif tag and was not generated by the Adobe DNG Converter, the matrix from the Exif data is prioritized above all others.
Applying an input profile is nothing more than a linear algebra operation on the image data. The input profile consists of a square matrix (3×3 for RGB based sensors) that is multiplied with the pixel vectors of camera-native RGB values. These matrices are specifically calibrated for a specific illuminant (D65, i.e. 6500K) and provide the most accurate color reproduction if the scene illuminant matches the calibration illuminant. However, the color accuracy is usually still good enough for very different light sources and white balances.
The benefit of a matrix profile over other profiles (e.g. table-based DCP or ICC profiles) is its linearity. Because no non-linear functions are applied to the data, the scene-referred linearity of the light intensities is kept intact. This is important for several image processing operations and for example when exporting for further editing (e.g. HDR applications usually require a predictable linear color response).
Auto-Matched Camera Profile
RawTherapee allows you to use custom DCP (Adobe DNG Camera Profile) or ICC (International Color Consortium) color input profiles. These can be tailor-made to specific scene conditions to provide the most accurate color rendition, or to generally improve upon the standard matrix profiles available.
RawTherapee ships multiple high-quality, custom-made,
general-purpose DCP profiles that can be automatically matched when an
image from a supported camera is opened. The available profiles are
found in the dcpprofiles folder in your installation
directory. It is possible to add your own DCP or ICC profiles to this
folder. Matching only works on the exact name of the camera
(case-sensitive) as is present in the image metadata.
Most provided DCP profiles are dual-illuminant (see below) and some provide tone curves and looks as well. New profiles are added exclusively based on user submission. Please read How to create DCP color profiles for further instructions in case you want to contribute.
Custom
Specify a custom DCP or ICC camera input profile when an automatic match is not available, or if you want to override the standard or matched profile. DCP profiles for your camera may be available through the Adobe DNG Converter. Read How to get LCP and DCP profiles for further information.
Be aware that when you load a custom ICC profile that it is an input profile. ICC profiles can be created for a multitude of purposes (printers, displays, etc.) and not all profiles are suited as a camera input profile. Your results may vary.
DCP
DCP Illuminant
Some of RawTherapee's profiles are single-illuminant (Daylight/D50), while others are double-illuminant (Daylight/D50 and Tungsten/StdA). If a dual-illuminant profile is loaded the "DCP Illuminant" setting will be enabled and you can choose which illuminant to use. The actual DCP standard (part of the DNG standard) does not provide this choice, but instead an interpolation between the two illuminants is calculated based on the chosen white balance (there will only be an interpolation if the white balance is in-between both illuminants, otherwise the closest is picked). This "interpolated" mode is the default setting of "DCP Illuminant" and for any normal use you do not need to change this.
You can however choose to base the color rendering on one of the specific illuminants. In some cases this might produce more pleasing color. It can also be interesting for diagnostic purposes to see how large (or small) a difference there is in color rendering between the illuminants, but, as said, for general use this setting should be untouched.
DCP Tone Curve
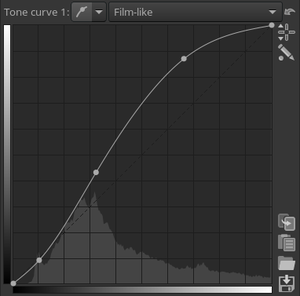
Some DCPs contain a tone curve which may be used to add contrast and brightness to provide a film-like look. This is mainly used for profiles simulating camera maker settings. The tone curve checkbox will be disabled for profiles which do not contain a tone curve.
The curve mode used by the DCP tone curve is the same as the Exposure tool's "film-like" mode, meaning you can reproduce the effect using the Exposure tool's tone curves in film-like mode. When contrast is applied with a film-like curve the appearance of the colors will change and overall saturation is increased, except for bright colors which instead are de-saturated. Some profiles which have curves embedded are pre-corrected for this color appearance change and will thus not provide the intended look without the curve applied. Most will however work well without the tone curve applied especially if you add a similar curve yourself using the Exposure tool's curves, but if you want to see exactly how the profile designer intended the colors to look you should enable the tone curve.
While the input color profile is applied at the first stages of the toolchain pipeline, the DCP tone curve is applied later in the pipeline at some point after the Exposure tool.
The curve used in some of RawTherapee's bundled DCP profiles is the
same as the default curve used by Adobe Camera Raw. You can get the
curve from this file: File:DCP tone curve.rtc
Set either tone curve in the Exposure tool to "Standard", set its mode to "Film-Like", and then use the ![]() "Load a curve from file" button to apply
"Load a curve from file" button to apply DCP tone curve.rtc
If the DCP profile has a copyright tag with the value "Adobe Systems", regardless whether it contains a tone curve or not, RawTherapee will automatically create a tone curve shaped identically to the Adobe Camera Raw curve. The reason for this is so that using the DCP in RawTherapee can match the results of using that DCP in Lightroom. This is why the "Tone curve" checkbox will not be grayed-out when using a DCP profile which has no embedded tone curve, as long as it has the copyright tag set as described.
DCP Base Table
This enables the DCP "HueSatMap" lookup table which is used to add non-linear corrections on top of the basic matrix. This is an advanced user setting and unless you want only the pure matrix result should leave it on. It's grayed out if the loaded profile lacks a HueSatMap table.
DCP Look Table
This enables the DCP "LookTable" lookup table which is intended to add a subjective look on top generally together with an embedded tone curve. That is if you disable the DCP curve and looktable you may get a neutral "colorimetric" profile, if the DCP was designed that way which is not always the case (if the DCP has both a look table and a base table it's likely that it is, but if it only has a look table it will probably not work well with it disabled). Disabling individual DCP elements are considered advanced user settings, normally you would leave this on.
DCP Baseline Exposure
The DCP may indicate an exposure offset that corresponds to an offset of the exposure slider. The purpose of this is typically to make the brightness of the image match the brightness of the camera's own JPEGs, which can be useful if you're shooting with auto-exposure. Currently this offset is applied "under the surface" so you don't see it on the exposure slider.
Note that if you are using Adobe's proprietary profiles those are expecting that the DNG's "baseline exposure" tag is applied too (the profile's offset is added on top). Currently there is no support for the DNG tag so you need to find that out on your own (using exiftool for example) and then set that offset using the exposure slider if you want to get the exact same brightness as in Adobe Camera Raw.
Implementation Notes
Third-Party DCP Support
The DNG Camera Profile, DCP, is the preferred camera input profile format for RawTherapee. All elements of the 1.4 DNG specification are supported, with the exception of the black render tag (see below). A DCP can be a pure matrix profile, it can have a LUT (typically 2.5D) to improve the colorimetric accuracy, and then it can have an embedded curve and a separate "look table" on top. It may also add an exposure offset. All these elements can be toggled on/off via checkboxes. However, you should be aware that a profile will produce the most accurate colors when all the elements it was designed to include are enabled. For example, using a tone curve changes the color appearance, so if you disable an embedded tone curve to get a linear profile you can't count on the colors being absolutely accurate. Nonetheless, most photographers rely on an aesthetically-pleasing appearance, and not on absolute accuracy, so this should not be a concern unless absolute accuracy is crucial. Typically, third-party profiles would come from Adobe Camera Raw/Lightroom/DNG Converter, and RawTherapee supports them. Many of Adobe's profiles lack a tone curve, but in Adobe's world that does not mean that no tone curve should be applied, but that Adobe's default curve should be applied. RawTherapee will therefore identify Adobe profiles (from the copyright string) and add the default curve to those (which you can toggle with the tone curve checkbox).
Adobe DNG Converter may add a "baseline exposure" to the DNG file. Some of Adobe's DCPs are designed to work with that baseline exposure and then produce a default output which is about the same brightness and contrast as the out-of-camera JPEG. RawTherapee can honor this baseline exposure if the DCP contains one.
The DCP format also has a black render tag. This indicates if the raw converter should do "automatic" black subtraction or not. RawTherapee ignores this tag - you can perform manual black subtraction with the Raw Black Points tool or with the black slider in the Exposure tool. As many of Adobe's profiles indicate auto black subtraction and Adobe Camera Raw/Lightroom does it, in those cases RawTherapee will render slightly lower contrast and brighter shadows.
Third-Party ICC Support
RawTherapee has specific support for ICC profiles bundled with Capture One and Nikon NX2, so those should work well. Older ICC profiles are not likely to work well though (typically the image becomes extremely dark with unsupported ICC profiles).
Some ICC profiles apply a tone-curve and desaturate bright highlights for a more film-like look. Those profiles may not work well together with Highlight Reconstruction. If you see a radical change in contrast when you apply your ICC profile, it has applied a tone-curve and then you should not use it together with Highlight Reconstruction.
Unlike DCP profiles, ICC profile processing may cause clipping of extremely saturated colors during conversion. In practice this is rarely a problem, but still DCP should be considered the primary choice if available.
Note on using Capture One ICC profiles: RawTherapee applies the ICC before exposure adjustments, as the intention is that input profiles should only be used to make the colors more accurate, and not to apply a look - you design the look using the tools instead. Phase One's ICC profiles contain a subjective look though, which means that they typically contain "hue twists", for example saturation in the shadows is increased. This means that if you have an underexposed file and push it a few stops, those hue twists have been applied to the dark image before the exposure adjustment and will thus be in the wrong place after adjustment; that is you don't get the same look as in Phase One's Capture One. Therefore it is recommended to have the right exposure out of the camera when using Phase One ICC profiles. You should also apply a suitable RGB film-like curve, as those ICC profiles are designed to be used together with that.
We are aware that LUT ICCs should typically be applied after exposure (just as DCP LookTables are applied), and that would support for example Capture One profiles better. This may be fixed in a future version.
Save Reference Image
Clicking the "Save Reference Image" button saves a linear TIFF image before the input profile is applied. This file can then be used for profiling, i.e. creating a camera input profile. You can use the open-source ArgyllCMS program to create ICC profiles, and DCamProf to create ICC or DCP profiles.
Cropping, resizing and transformations (rotation) will be applied, allowing you to make the output image more manageable by the receiving software. ArgyllCMS is very picky for instance, and requires that only the test target is visible in the image.
You can also choose if you want to export with white balance applied or not. For ICC profiles you should export with white balance applied, but if you intend to make a DNG profile or a dcraw-style color matrix you should export without applying white balance.
Working Profile
The default working profile is ProPhoto and should not be changed for normal use.
The working profile specifies the working color space, which is the color space used for internal calculations, for instance for calculating saturation, RGB brightness/contrast and tone curve adjustments, chrominance, etc.
When RawTherapee was based on integer math it was wise to not use working space larger than absolutely needed to get the best precision in the calculations. However, RawTherapee had switched to floating-point processing in 2011, and since version 4.0.12 the default working profile is ProPhoto, which has a very large gamut.
The choice of working profile has an influence on the effect of the curves in all modes except for perceptual - in that mode, changing the working profile will not alter the effect of the curve. If you have trouble fitting colors within the output gamut you can experiment with changing the working profile when using curves in any mode but perceptual.
Note that the working profile will only specify the red, green and blue primaries, gamma will not change as RawTherapee's processing pipeline is floating point with no gamma encoding (that is gamma = 1.0). Some tools (like curves and histograms) will still display with a gamma (usually sRGB gamma) which is hard-coded for the tool and stays the same regardless of working profile.
Adding Custom Working Profiles
RawTherapee 5.5 allows you to specify custom working profiles through a JSON file. The file should be named workingspaces.json and it can reside in:
- the ICC profile folder as set in Preferences > Color Management > Directory containing color profiles,
- or in RawTherapee's own ICC profile folder:
- Windows:
<rt-install-folder>\iccprofiles - Linux:
- When installed using your package manager or self-compiled with
BUILD_BUNDLE=OFF:/usr/share/rawtherapee/iccprofiles - When self-compiled with
BUILD_BUNDLE=ON:<rt-install-folder>/iccprofiles
- When installed using your package manager or self-compiled with
- macOS:
/library/ColorSync/Profiles/Displays
- Windows:
The format of workingspaces.json is as follows:
{"working_spaces": [
    {
        "name" : "ACES",
        "file" : "/path/to/ACES.icc"
    },
    {
        "name" : "ACEScg",
        "matrix" : [0.7184354, 0.16578523, 0.09882643, 0.29728935, 0.66958117, 0.03571544, -0.00647622, 0.01469771, 0.66732561]
    }
]}
If "matrix" is present, "file" is ignored. If only "file" is present, the matrix is extracted from the ICC profile. For this, RawTherapee looks only at the R, G, and B matrix columns and the white point set in the profile. Bradford adaptation is used to convert the matrix to D50. Anything else in the profile (LUT, TRC, etc.) is ignored.
It is the user's responsibility to ensure that the profile is suitable to be used as a working space.
Abstract Profiles
What is an Abstract profile?
- According to the International Color Consortium (ICC), Abstract profiles allow you to perform custom image effects, such as applying a particular “look” to a series of images. Such a profile allows you to define CIELAB (or CIEXYZ) values as both Input and Output. This means you can algorithmically define whatever color changes you like and produce the corresponding LUT. A small number of color management applications support the creation and/or use of Abstract profiles.
- In the case of RawTherapee this is achieved using the Virtual profiles in LCMS, which allow you to modify the data using the same algorithms and principles as those used for Input profiles or Output profiles i.e. by acting on one or more of the 3 ICC profile components i.e. Tonal response curve (TRC), Illuminant (white point) and Primaries.
- Is an Abstract profile part of color management? This is debatable but it is certainly more so than the Working profile, which is simply a transformation in C++ code that converts RGB data into XYZ. If we use the ICC and LCMS (virtual profile) definitions, the answer is definitely yes.
- Note that Abstract Profile only works with the provided working profile package: ACESp0, ACESp1, Adobe RGB, Best RGB, BetaRGB, BruceRGB, ProPhoto, Rec2020, sRGB, WideGamut. The use of "Adding Custom Working Profiles through a JSON file" is not possible.
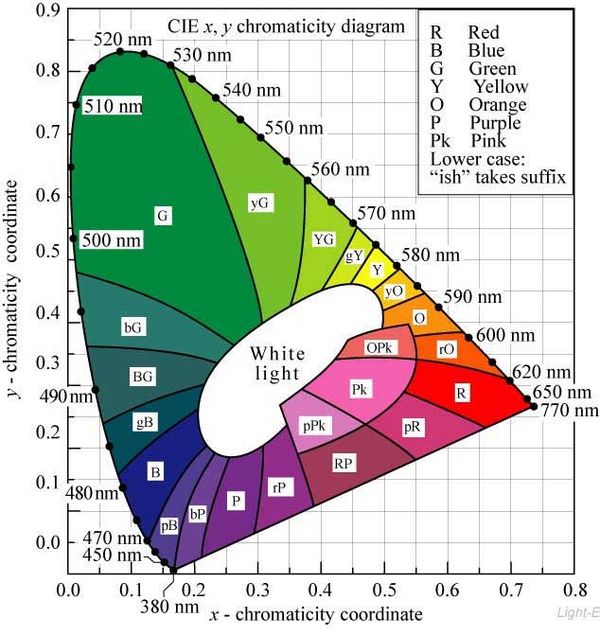
The CIE xy diagram
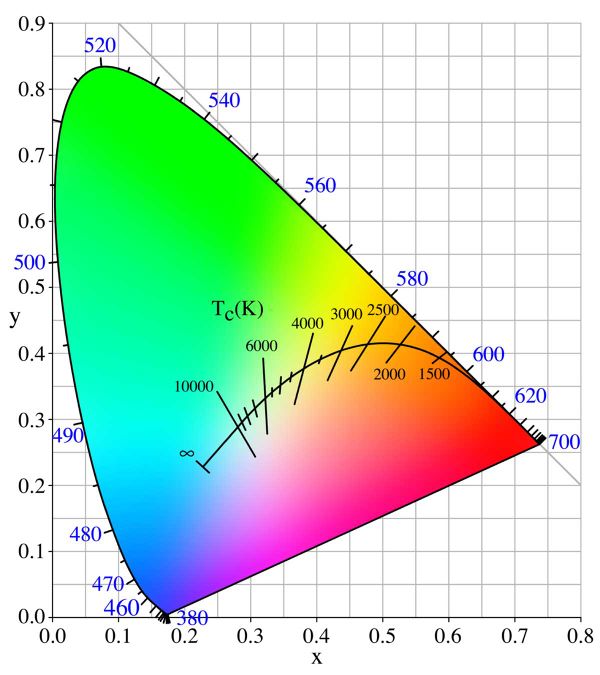
The LCMS virtual profile modifies the "x" & "y" data, which is one of the possible representations of the colorimetry. This representation makes it possible to easily see:
- The limits of human vision in terms of visible frequencies from 380nm to 770nm.
- A triangular color-space model based on the primaries.
- The curve showing the evolution of the white point (one of the bases of the illuminants D50, D65, Std A, ).
- Note that this representation must be interpreted with care, because it is a vertical projection of the gamut. A color that is outside the gamut triangle is necessarily out of gamut, but a color inside the triangle can also be out of gamut, because this projection ignores the luminance component.
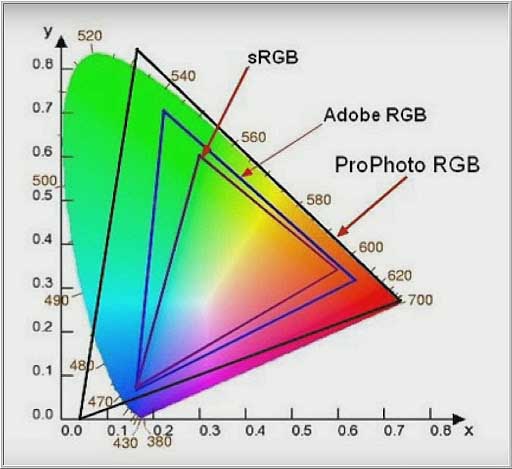
Some Primary values
- sRGB - Red x=0.64 y=0.33 - Green x=0.30 y=0.60 - Blue x=0.15 y=0.06
- Rec2020 - Red x=0.708 y=0.292 - Green x=0.17 y=0.797 - Blue x=0.131 y=0.046
- ProPhoto - Red x=0.7347 y=0.2653 - Green x=0.1596 y=0.8404 - Blue x=0.0366 y=0.0001
- ACESp0 - Red x=0.7347 y=0.2653 - Green x=0 y=1.0 - Blue x=0.0001 y=-0.077
- JDCmax - Red x=0.7347 y=0.2653 - Green x=0.0219 y=0.903 - Blue x=0.1206 y=0.0016
When one of the primaries is outside the limits of human vision we speak of imaginary colors.
Use of data from the "CIE xy" diagram in Abstract profiles.
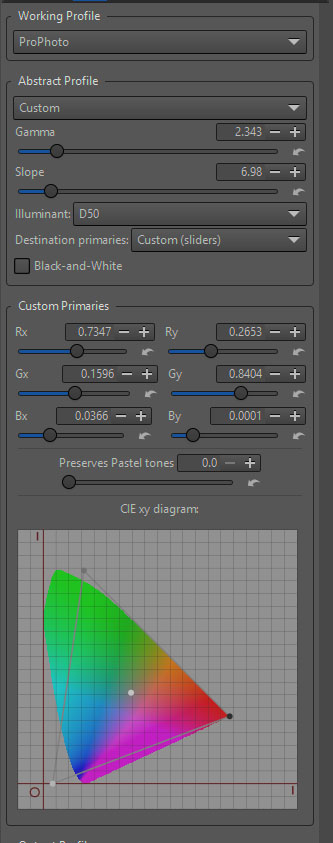
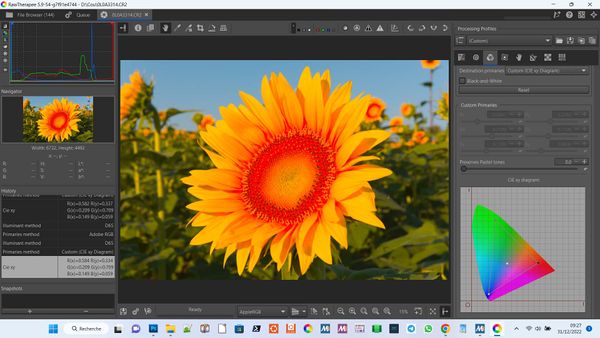
You can modify the 3 components of the virtual profile as you wish. The screen capture represents a configuration allowing you to improve the "calibration" of the Input profile.
- In this example, the Working profile is Prophoto, where the primaries have not been modified. When you choose "Destination primaries” > Custom the algorithm will by default choose this particular Working profile to build the Abstract or Virtual profile.
- If you change "Destination primaries" to any value other than those used for the Working profile you can create special effects similar to those produced in the more familiar Color Toning or Channel Mixer modules.
- You can change the D50 Illuminant to another value, either to create or amplify some special effect, or adapt the illuminant to a specific case.
If the first combobox in the Abstract Profile panel is set to Custom, the CIE xy diagram will display the default working-profile values. i.e:
- The 3 primaries: Red, Green & Blue.
- The white point.
If the first combobox in the Abstract Profile panel is set to Custom or some other option (e.g. BT709 etc.), the CIE xy diagram will display:
- The primaries and the white point of the profile selected in the "Destination primaries" combobox.
In addition to the profile options in the "Destination primaries" combobox there are also two custom options.
- Custom (sliders):
- The sliders Red (X, Y), Green (X, Y) & Blue (X, Y) will be active.
- The combobox Illuminant will be active.
- Any changes to the slider values will be shown in the CIE xy diagram. Note that the "Custom (sliders)" option does not allow you to make changes directly on the graph.
- Custom (CIE xy diagram):
- You can modify the primaries directly on the graph using the mouse and the changes will be made automatically to the Red, Green & Blue sliders. Note that in this case you can only modify the slider positions by moving the points on the graph.
- The illuminant cannot be changed.
Note: If we take the example shown in the screen capture above (with the sliders set to the ProPhoto primary values):
- When you move the red primary vertically upwards, reds will move towards magenta.
- If you move it down the reds move towards orange.
Note that the color shifts move in the opposite direction to the red primary. This is because moving the primary upwards causes the colors to rotate clockwise around the white point (shown in the diagram "the limits of human vision"). Moving the primary downwards causes the colors to rotate counterclockwise. Similar behavior can be observed with the green and blue primaries.
- When you move the red primary to the left, (reducing the distance to the white point) the saturation will increase.
- If you move it to the right, the saturation should decrease but additional colors will be added. This behavior is normal.
Still using the same example:
- When you change the illuminant (in this case D50) to a lower temperature (D41, stdA), the reds will turn orange. If you change it to a higher temperature (D80, D120) the reds will turn magenta. This is also normal.
This behavior is "normal", but why? The reason is that we don't modify the Working profile. Instead, we modify the data that has already been modified in the processing pipeline. For didactic purposes, let's look at the operation of CIECAM02/16 in symmetrical mode. If the white balance is set to 7500K for example and it corresponds to the illuminant at the time of shooting, the image will have yellowish whites and an overall dominant red color. Cat02/16 chromatic adaptation will allow us to cool down the image by setting the temperature in Viewing Conditions to the corresponding white balance i.e. 7500K. The white balance acts as the Working profile upstream and chromatic adaptation acts as an Abstract profile downstream.
Note: the diagram is given for information only. The limits are not always very precise, especially towards the greens.
Which data and profiles are used or modified?
The Abstract profiles (Virtual profiles) implemented here:
- Do not change the Working profile.
- Do not modify the Input profile.
- Do not modify the Output profiles.
- But they modify the data in the same way as any other RawTherapee algorithm. Particular features:
- The Abstract profile, which corresponds to a virtual ICC profile
in LCMS, acts as a patch at the end of the pipeline (just before Ciecam
and just before the conversion to a screen profile or an Output
profile). It acts on the 3 components of the ICC profile (Tone Response
Curve, Illuminant (white point) & Primaries). Depending on the
choices and settings, the image appearance can be modified as follows:
- In depth by acting on the distribution of luminance and colors – rather like a Channel Mixer or Color Toning to which an extra dimension has been added.
- On the luminance distribution via the TRC, either to change the default aspect, which in RawTherapee is an sRGB TRC, or to act as a Shadows/Highlights control.
- To modify or refine the results of the Input profile with the help of a color chart (Colorchecker24 or other), either with the same illuminant that was used during the elaboration of the Input profile, or with another illuminant. In this case CIECAM will need to be used also.
- The Abstract profile, which corresponds to a virtual ICC profile
in LCMS, acts as a patch at the end of the pipeline (just before Ciecam
and just before the conversion to a screen profile or an Output
profile). It acts on the 3 components of the ICC profile (Tone Response
Curve, Illuminant (white point) & Primaries). Depending on the
choices and settings, the image appearance can be modified as follows:
Three main uses (with or without CIECAM)
- TRC: adjust gamma and slope to: a) modify the image rendering, which by default is g=2.4 s=12.92; b) raise the shadows and modify the lighter tones while preserving the colorimetry and the gamut.
- Illuminant (white point): a) adjust the gamut of the Working profile to adapt it to the shooting conditions taking into account the colorimetry. If an image is taken at 4000K, in sRGB (which is D65), the gamut may not be suitable. The joint action of the Illuminant and CIECAM (symmetrical mode) allows you to ensure good chromatic adaptation; b) used in conjunction with the modification of the Primaries below.
- Primaries: this is where the notion of Abstract profiles comes into its own. You can use this module:
- as a Channel Mixer to create special effects similar to Color Toning, with or without CIECAM.
- to restore image color (saturation). Color balance will be maintained in the majority of cases.
- to modify or refine the result of the Input profile to improve the colorimetry (calibration).
Where is it located in the toolchain pipeline?
It is located at the end of the process, just before CIECAM and allows the user to either:
- Apply special effects similar to Color Toning > Color Correction Regions.
- Make color corrections (calibration) at the end of the process just before the Output profile taking into account image modifications made upstream.
This position also avoids the introduction of non-linearities.
TRC - Tone Response Curve
This feature allows you to vary the gamma and slope based on the Working profile. It does not modify the profile, but takes its characteristics into account. It is applied at the end of the process, just before CIECAM. It can be found in other software such as UFRaw©, as well as in Output profiles.
It has several objectives:
- Didactic: you can see the main differences resulting from
changes in gamma (g) and slope (s) directly on your monitor. For
example:
- With standard gamma = 1.8 - used in the Output profile by Prophoto.
- With standard gamma = 2.2 - used in the Output profile by AdobeRGB.
- With a TRC e.g. BT709 which corresponds to gamma = 2.22 and slope = 4.5. This has a linear part up to a value of 4.5, then a logarithmic part with g = 2.22. This combination gives the same result as the "standard gamma = 1.8" for the medium tones and highlights, but has improved shadow rendering by removing the impression of grayness.
- An sRGB TRC, which corresponds to g=2.4 and s=12.92. This has a linear part up to the value of 12.92, then a logarithmic part with g=2.4. This is the usual rendering chosen by many software applications including Lightroom©, as well as the default screen output and output of RawTherapee.
- Particular export requirements: you can decide to work with a linear gamma for example, for exporting to another software application (for printing, or for modification in Photoshop or Gimp) and/or to see the results directly on your monitor.
- Action on shadows and highlights: this feature does not replace
the other RawTherapee modules such as Shadows/Highlights, or the curves
in Exposure, etc., but is complementary to them:
- You can lift the shadows by using the Slope slider. Values up to 300 allow a significant transformation of the image in the shadows.
- You can act on the highlights and mid-tones by acting on the Gamma slider. Values up to 15 are possible.
- You can observe the impact on the histogram.
- Adjust the luminance of the gray tones, for example when using a ColorChecker24 for calibration.
- Note that the Slope slider is only active for values of Gamma
>1. Because of the algorithm used to generate the tone response
curve, it will show erratic behavior when set to values below 1 and
greater than 0.It behaves as expected when set to zero.
- When Slope is set to 0, only the gamma component of the TRC curve is activated. The image rendering will be similar to profiles such as “AdobeRGB 2.2” or “ProPhoto 1.8”.
- When Slope reaches the value 1 (in fact when Slope = 1 the system behaves as if gamma = 1), the number of shades of gray in the shadows are reduced and the shadows become darker. The overall contrast is increased with only minor changes to the mid-tones and highlights.
- Depending on the gamma setting, increasing the Slope will make the shadows progressively lighter. High Slope values (50 or more) require a high gamma value to take full advantage of the possibilities.
- Different profiles may have parts of their respective TRCs that are similar. For example an image opened with “Adobe g=2.2” will have approximately the same luminance values for the midtones and highlights as one opened with “sRGB g=2.4 s=12.92”. However there will be significant differences between the two in the shadows.
Differences compared to a classic tone curve
- As previously mentioned, it is located at the end of the process to avoid non-linearities as much as possible and guarantee better quality results.
- When used in conjunction with Illuminant or Primaries it guarantees that the result stays in gamut and gives better colorimetry. When it is used on its own (with Illuminant and “Destination primaries” set to the default values), there is no gamut control (to optimize processing time). Changing any of the default values will immediately invoke the gamut control.
- The linear part, often with a small value (s= 2 ... s=13), connected to a parabolic part is practically impossible to realize with a tone curve.
- It constitutes - as soon as you activate "Illuminant" (if only to confirm the illuminant, for example D50 for ProPhoto), or "Primaries" - a part of a virtual ICC profile that can be applied to an image or a series of images at the end of the process.
Illuminant - white point
By default, the illuminant is set to the corresponding value in the Working profile. For example this corresponds to D50 for "ProPhoto", D65 for "sRGB", D60 for "ACESp1".
Why change it? There are several reasons for wanting to change this value:
- To deliberately change the colors as you would with a Channel
Mixer or with Color Toning. If we examine the "CIE xy" diagram, we can
see that when we change the illuminant the white point moves:
- Towards the red zone if the temperature of the illuminant drops.
- Towards the blue zone if the temperature of the illuminant increases.
Used this way we are essentially modifying the red / blue balance.
- To "patch" the Working profile and adapt the colorimetry to specific images. For example, let's imagine that we took pictures around dusk and that the Working profile is "Prophoto" with a D50 illuminant.
- There are two possibilities:
- You want to accentuate the effects of the sunset and make the image even warmer. In this case choose a white point with a temperature lower than the Working profile; for example D41 if the Working profile is "Prophoto D50".
- You want to optimize the gamut to get the best range of colors in sunset shooting conditions. In this case choose a white point that has a temperature higher than the Working profile. For example if the Working profile is "Prophoto D50", and the shot is around 4000K, then choose an illuminant around D60 or D65. Note that the white point function is not linear so the approach can only be approximate.
- The virtual profile will "patch" the data by changing the XYZ values of the RGB-XYZ conversion matrix to better fit the image data, thus avoiding out-of-gamut values.
Primaries
By default the primaries are set to the values of the Working profile, so why change them?
- To create special effects similar to those that can be produced
in the Channel Mixer or in Color Toning - note that a "primaries"
Channel Mixer is a little more intuitive than an RGB Channel Mixer in
the sense that a primary adjustment acts mainly on the particular
primary color - in this case there are two possibilities:
- You can choose a set of primaries that are different to those used in the Working profile by selecting a different profile in the drop-down list in the “Destination primaries” combobox. This will have the effect of moving the triangle on the “CIE xy” diagram to take into account the difference between the primaries in the Working profile and the primaries used in the “Destination primaries”. This introduces a constant shift in any images to which this “patch” is applied. The final result will of course depend on how the colors are distributed in each of the images. In principle, in this case, the color balance is observed. If you choose a "Destination primaries", larger than the "working profile" you will desaturate the image. Conversely, if you choose a "Destination primaries" smaller than the "working profiles" you will increase the saturation.
- You can also adjust the primaries individually by selecting Custom in the drop-down list in the “Destination primaries” combobox. In this case you can modify the location of the 3 vertices of the triangle of “Destination primaries” giving you almost unlimited possibilities.
- To modify/refine images so that they are as close as possible to the shooting conditions (deltaE minimized).
- The use with a chart (ColorChecker24 ...) is almost mandatory.
- CIECAM should be used if we want the Input profile to be relevant when used with an illuminant other than the one used to create it in the first place.
Example TRC & Primaries
This example helps to understand 3 simple changes:
- TRC: a) substantial shadow action with the Slope slider; b) moderate action on the lights with the Gamma slider.
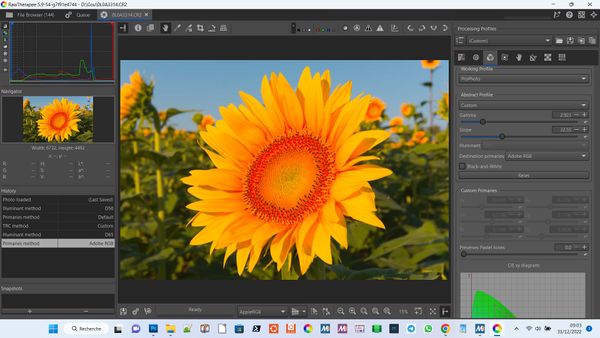
- Destination primaries: increase the overall saturation of the image by choosing Adobe RGB as 'Destination Primaries', with 'Working Profile' unchanged Prophoto.
- Custom CIExy diagram: change the balance of the image.
Of course, you can finely modify saturation, chromaticity, colorfullness, brightness and lightness with the modules 'Color Appearance & Lighting (main)' or 'Local adjustments - Color Appearance (Cam16 & JzCzHz)'
Raw file: (Brian Poindexter - Creative Common Attribution-share Alike 4.0): [1]
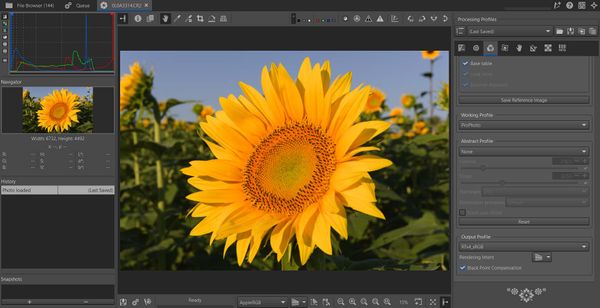
Original image (Rawtherapee - default)
Apply a TRC
Examine the green part of the image:
- The more you act on Slope, the more the dark part will lighten
- The more you act on Gamma, the brighter the light part will be.
Change primaries
Adobe RGB replace Prophoto (Working profile), Rawtherapee's default setting
Try changing 'Destination primaries - Adobe RGB' to another value, for example Rec2020 or ACESp0
Change primaries - Custom CIExy diagram
The change concerns only the red point from Adobe RGB: observe the image and the change in the values of the primaries Rx, Ry
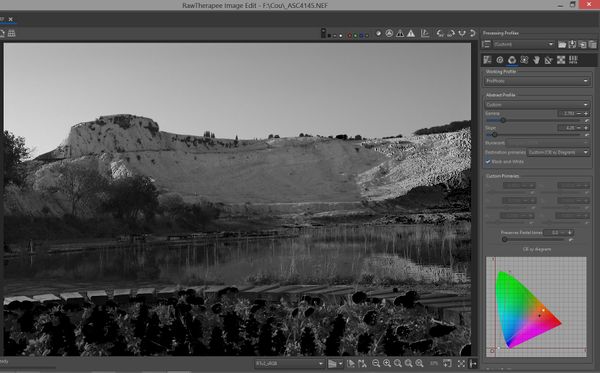
Black & White
Abstract profiles can also be used to produce striking black & white effects by varying the three components of the profile. For example by:
- Shifting the white point to a completely different setting e.g. to Tungsten 2000K.
- Significantly moving the primaries away from their working-profile settings.
- Using a different TRC to change the way the gray tones are distributed in the image e.g. by using a TRC g=2.793 s=4.26.
You can also use this module in conjunction with the CIECAM02/16 module to obtain color-toning effects such as Sepia etc., by modifying Temperature and Tint in the CIECAM Viewing Conditions (Advanced mode).
The settings given in the example are for didactic purposes. Of course you can (should) use settings that are closer to the Working profile values.
Raw file: [2]
How the "Primaries and White Point" algorithm works
When you change the primaries and white point, a new "XYZ=>RGB" matrix is applied to the data. This matrix is produced using the following simplified algorithm:
- Start with the chromaticity values of each of the red green and blue primaries (these correspond to the xyY values when Y=1).
- Convert the xyY values to XYZ to derive the first XYZ matrix: [M1].
- Invert this matrix: [IM1].
- Using [IM1] and the source XYZ white point values (e.g. D45, D55, D60, StdA etc.), derive the values of Sr, Sg & Sb.
- Produce a new matrix [Mat_xyz] by multiplying Sr, Sg, Sb with the original XYZ data in [M1].
Bradford transformation
- Preamble: Bradford is a chromatic adaptation, based on the concept of "response cones". Its purpose is to adapt the XYZ data calculated using a D50 illuminant to the XYZ values for another illuminant such as D41, D55, etc. It uses the concepts of "RGB source" (RGB s) and "RGB destination" (RGB d), to calculate the "response cone" values. This is similar to the LMS (long, medium, short) concept, which is a colorimetric space that represents the responses of the 3 types of cones in human vision.
- Calculate RGB s = Source White point * [M(Bradford)].
- Calculate RGB d = D50 White point * [M(Bradford)].
- Calculate the Cone _response (destination source) = RGB d / RGB s.
- Develop a new matrix [Cone_matrix] = Cone_response * [Inverse-M(Bradford)].
- Develop a new matrix [Chromatic_adaptation] = [M(Bradford)] * [Cone_matrix].
- Develop the final matrix taking into account the source White-point: [Mat_xyz_bradford] = [Mat_xyz] * [Chromatic_adaptation].
Display Matrix XYZ-RGB - "Mat_xyz_bradford"
- If you run RawTherapee from the console, and in options set verbose = true, the XYZ to RGB conversion matrix "Mat_xyz_bradford" will be displayed. It takes into account the "Destination primaries" and Illuminant.
- Example with "Destination primaries” = Rec2020 and illuminant set to D80.
- Illuminant: D80
- rX=0.661827 gX=0.178737 bX=0.123636
- rY=0.274860 gY=0.678752 bY=0.046389
- rZ=-0.00275 gZ=0.031042 bZ=0.796608
Important note:
- The source white point is only used to modify the ICC profile (the data of the XYZ-RGB matrix). In-depth modification of the image cannot result from this modification and is part of the color-management process (White Balance, CIECAM,etc.).
Possible example of use to modify/improve the behavior of the Input profile
- Switch to Neutral.
- Load the image of the chart that was used to create the Input profile, with corresponding white balance settings.
- Choose the profile (Bundled profiles...) that you usually use (default : Auto match Curve - ISO Low), with no other settings.
- Choose Abstract Profile > Custom. By default the selected profile will be the same as the Working profile (as will the Illuminant). Do not change these values.
- Select Custom in "Destination primaries”.
- The Working profile primaries are displayed, you can now modify them.
- Activate the Lockable Color Picker.
- Select among the patches: 2 or 3 grays distributed between the darkest and the lightest, 1 red (saturated), 1 green (saturated), 1 blue (saturated).
- The L*a*b* values of these patches (chart references) are the target values.
- Adjust gamma (g) and slope (s) so that the 3 grays are as close as possible to the reference values.
- Change the "x" and "y" values of the Red, Green and Blue primaries so that the measured values are as close as possible to the reference values.
- Use "Preserves Pastel tones" if necessary: this slider allows you to avoid modifying very lightly saturated tones (close to neutral tones) and allows you to progressively reduce the action on pastel tones.
- Save the result.
If you want your profile (e.g. developed in D50) to be used for another temperature range, it is necessary to take Cat16 into account in CIECAM:
- Choose the new temperature in "White balance" - for example 6000K.
- Select Color Appearance & Lighting (CIECAM02/16).
- Select: CAM Model = CIECAM16.
- Select CatO2/16 mode = Automatic Symmetric.
- Adjust the temperature in Viewing Conditions to that of the white balance (in this example 6000K),
- Then use the same process as before.
To use the results of this virtual profile for other images, do the following:
- Right click on the thumbnail in the file browserand choose "Processing profile operations" > Copy,then "Paste partial" > "Color management".
Note: the values can of course be adjusted empirically as in ART and Lightroom. For small deviations from the original primaries, the results are fairly predictable. On the other hand, if we make big changes, the results will be less so.
Output Profile
Specify the output color profile; the saved image will be transformed into this color space and the profile will be embedded in the metadata. The effects the output profile has on the image cannot be seen in the preview.
RawTherapee lets you specify "input" (e.g. your camera's profile), "display" (e.g. computer screen) and "output" (e.g. printer) device class profiles with an RGB color space, because RawTherapee saves only RGB images. Profiles listed in this combobox are those which come bundled with RawTherapee and those located in the folder set in Preferences > Color Management.
The soft-proofing feature is dedicated to simulating printer rendering. It lets you preview what your image will look like when printed, assuming you use a printer profile which correctly simulates your printer and paper combination. For best printout quality, after you have tweaked your photo using soft-proofing, you should select your printer profile as the output profile and save the image using it. This ensures that the image is encoded using your printer's color space directly from RawTherapee's internal high quality floating-point representation, instead of being saved to an 8-bit image in sRGB for example and then having to be subsequently converted to the printer profile, which would be quite lossy.
The main histogram, navigator and clipping indicators will use
either the working or the output profile. You can choose the behavior by
using ![]() button in the Editor tab.
button in the Editor tab.
The recommended output profile when you're saving to an 8-bit format and/or publishing to the web is RTv4_sRGB. If no profile is selected, none will be embedded, which means that "sRGB" is implied, though it is safer to embed RTv4_sRGB to ensure your image is displayed properly in various applications.
RTv4_sRGB is a higher quality version of the standard sRGB profile, which surprisingly is inconsistent between implementations. RTv4_sRGB was custom-made for RawTherapee and has 4096 LUT points, as opposed to the lower quality 1024 point sRGB profiles. Applications that aren't color managed and won't take advantage of RTv4_sRGB will fall back on sRGB.
Wide-gamut output profiles such as RTv4_Large are generally used if you export to a 16-bit or higher bit-depth format for further editing in another application. If you will be sending your image for printing, a wide-gamut output profile is also recommended, since some printers may have wide gamuts (at least in certain colors).
You should have a wide-gamut monitor if you want to work with wide-gamut profiles, otherwise you're flying in the dark.
Bundled Output Profiles
RawTherapee comes bundled with a number of custom-made, high quality output profiles. There are two types: ones compatible with ICC v2, and ones with v4. The v4 versions should be compatible with most modern software. The legacy v2 versions are supplied as a fallback.
Each ICC profile's filename describes the ICC version and the primaries of the output space:
- sRGB: similar to sRGB.
- Medium : similar to AdobeRGB1998.
- Large: similar to ProPhoto.
- ACES-AP0: similar to ACES AP0.
- ACES-AP1: similar to ACES AP1.
- Wide: similar to Widegamut.
- Rec2020: similar to Rec2020.
- Best: similar to Best.
- Beta: similar to Beta.
- Bruce : similar to Bruce.
By default all these profiles have a TRC (Tone Reproduction Curve) with gamma=2.4 and slope=12.92.
You can customize these profiles using the ICC profile Creator, which allows you to:
- change the TRC and assign any value from 1 (linear gamma) upwards.
- change the primaries and illuminant to suit your needs.
- change the labels, description etc.
